
AutoRV10
This is a quick "howto" step-by-step guide describing how to backup DVD content into RealVideo 10 and RealAudio 10, using AutoRV10 and a couple of other tools.
1. AutoRV10 includes native support for multi-channel encoding, anamorphic encodes, and the new RV10 'Elysian' rate control and inloop filter options. Get it from this post in the Doom9 forum.
Do not go to the main site, where only AutoRV9 is available. Get the
first zip file referenced directly from the forum post. Then unzip
AutoRV10_v1.0_b4.zip its own folder, make sure to preserve the
directory structure. This now includes DVD Decrypter and DVD2AVI so no
other downloads are needed, except the very latest AviSynth (2.5.5).
IMPORTANT: Since these are not final versions, an installer is not
provided, and the zip files do not contain all the VB6 DLLs etc needed,
so if you have trouble getting AutoRV10 to work, download AutoRV9 first
from the main AutoRV9 site and run its installer. You do not need to
run AutoRV9. You also need to manually install the latest AviSynth before
AutoRV10 will work. Follow the download link, then scroll down to the
alpha section, where you can find the latest 2.5.5.
*) www.avisynth.org: AviSynth is a scripting tool, which makes it possible to create a text file that appears like an AVI file to any tool or player opening the file. I frequently use AutoRV10 just so I can create an AviSynth script and Producer job files, corresponding to my source, and then run Producer manually.
This is easily achieved with DVD Decrypter, which is so simple to
use no instructions should really be needed. You can find DVD Decrypter
in the Softs\DVDDecrypter sub-folder of AutoRV10. For now, this
guide describes the process of running DVD Decrypter separately, and
outside of AutoRV10. I will update to describe the "Ripper" panel of
AutoRV10 and also how to use this to create chapters and/or sub-titles.
Usually everything will be default. Just choose Mode->IFO, and it will pick the main movie to decrypt. Choose a destination folder where there is enough space, and then when ready, the big button indicating the transfer from the DVD to the hard-drive.
DVD2AVI (in Softs\dvd2avi sub-folder of AutoRV10) is used to create
a text index of the contents of the VOB
files. This is a .d2v file. It also extracts the AC3 audio track from
the VOB files into a separate file. Later, AutoRV10 will create a
so-called AviSynth script that merges the video information as obtained
by an MPEG-2 decoder reading this text index, with WAV file(s) that
correspond to the decoded AC3 file. For the actual encoding, AutoRV10
then uses this AviSynth script (.avs) as the input file to Producer,
since it appears like an AVI file.
Start DVD2AVIdg 1.2.0 RC7 (this is the one included with AutoRV10). Select File->Autoincrement Open and open the first of the VOB files DVD Decrypter saved. DVD2AVI will automatically include all the VOB files for you. Click on OK to continue.
One way to figure out if this setting will work is to leave the setting to None, and select Options->Preview. If the Statistics window shows Frame Type Progressive, and Video Type FILM at 95% or higher, you are good to go. Hit Escape to stop the preview, and set Field Processing Mode to Forced FILM.
If, however, the preview shows Frame Type Interlace, and/or Video Type NTSC, you have to leave the Field Processing Mode to None. Then you have to select an inverse telecine filter or a de-interlace filter in AutoRV10. Which type of filter, depends on the content, and can be rather complicated. For most movies, you will choose the Decomb filter (see screenshot in section below). For more information on this topic, wander over to Doom9's IVTC Guide.
DVD2AVI also extracts the AC3 sound track. Open the ...stream information.txt file that was saved by DVD Decrypter, and find the sound track you want to encode. In most cases, this is numbered 0x80. Then in the Audio menu of DVD2AVI, select Track Number to match the track you have chosen to encode. Track Number 1 corresponds to 0x80, 2 corresponds to 0x81, etc. Make sure Audio->Output Method is set to Demux (AC3, MPA, DTS), and Audio->48-44.1KHz is set to Off.
Now choose File->Save Project (not Save AVI!), and save your project to an appropriate filename like moviename.d2v. This will save moviename.d2v and the AC3 track to something like "moviename AC3 T01 3_2ch 448Kbps DELAY 0ms.ac3". The D2V file is just a text index of the MPEG-2 data in the VOB files, while the AC3 file is the actual AC3 audio data.
First you will have to tell AutoRV10 the location of producer.exe, rmeditor.exe, and besweet.exe, which are the tools it will use. Normally you can leave these to their default values, which lets it use the versions it comes with. BeSweet is used to convert the AC3 audio track into a 2-channel surround sound WAV file, or 6 separate WAV files for multi-channel. Producer is used for encoding, and rmeditor for any potential file splitting or merging at the end.
The Ripper section is now working, but will be desribed later. Use procedure described above.
Click on the Input tab of AutoRV9 and set the Video Source File. This should be the .d2v file you saved from DVD2AVI. Here is a screenshot of what AutoRV9 should like like now:

Then click on the Audio tab, and set the AC3 file provided by DVD2AVI in the Audio Source Path. If there is an audio delay in the AC3 file, AutoRV10 will automatically fill in the delay box. Select the Channels Mode, Surround or Multi-Channel. Surround is matrixed Dolby Surround encoded as 2 channels. Multi-Channel is true discrete multi-channel RealAudio 5.1. For Surround, the Bitrate will usually be 64 or 96 kbps using RealAudio 10 HE-AAC as the codec. For Multi-Channel, 132 kbps or 182 kbps, and the codec is RealAudio 10 Multi-Channel. Uncheck the Force 44.1 kHz checkbox in the Sampling Rate section. This will let Producer use its own resampling, which is faster and better quality that the one in Besweet. Leave other options as default. Remember to press the blinking Add Stream button, otherwise no audio will be encoded.
When the input is 5.1 channel AC3 audio, BeSweet will correctly downmix this into 2 channel Dolby Surround sound. When the Channels Mode in AutoRV10 is set to Surround, it should preserve this Dolby Surround information in the RealAudio encoding.
For Multi-channel encoding, BeSweet will convert the 5.1 AC3 track into 6 separate WAV files that will be automatically merged in the AviSynth script used as the input to producer. AutoRV10 generates this AviSynth script, as part of its process.
Most DVDs have lower than normal audio levels. In AutoRV10 an option in BeSweet is invoked such that audio levels are normalized.
After you have selected the audio track and added the stream, AutoRV10 should look like this:

Now it is time to the the Video settings. Click on the Video tab of AutoRV10. Start by clicking on the Manual Crop button, drag the slider to a bright frame, and click on Auto-Crop. If this fails, set the crop numbers back to zero and try again for another frame. If Auto-Crop is un-successful, it is also easy to set the cropping manually. Auto-Crop usually leaves a few blacks lines, so make sure no black lines are left, by manually adjusting the crop values. It is better to crop a few pixels too many, than to leave any black edges.
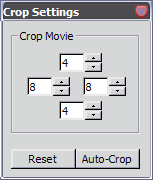

Here you can also choose where the credits start. Drag the slider to roughly the right point, no need to be frame accurate. Click on End Credits at the top of the main crop dialog. This will encode the credits at a fixed low quality, leaving more bits for the main movie. AutoRV10 will use rmeditor at the end of both encodes to merge the two parts.
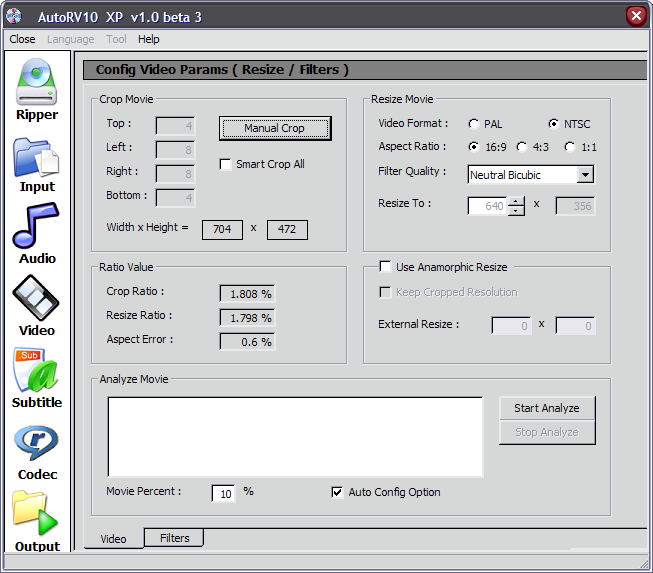
In the Resize Movie box, select NTSC or PAL (NTSC for U.S. content), and Aspect Ratio. For wide-screen anamorphic content, the Aspect Ratio should be 16/9, for full-screen or non-anamorphic it should be 4/3. If you are in doubt, this should also be listed on the cover, and in the .txt file created by the ripping program, for example like this : "0xE0 - Video - MPEG-2 / 720x480 (NTSC) / 16:9 / Letterboxed". If you are still in doubt, with the Crop window mentioned above you can choose View->Resized and it will show you the final size and aspect ratio you selected. Looking at faces of well known actors, or objects that are supposed to be circular (wheels) are useful for checking the aspect ratio. In most cases, this extra check is not needed though.
Note that in the crop example above, View->Resize is not selected, and you can see that the aspect ratio appears wrong. It will still be correctly encoded, since chosen resizing will take place during the encoding process.
Set the Filter Quality to Neutral Bicubic and set the Resize to desired width, usually 640. For the highest possible quality, and as close to the original as possible, choose Anamorphic Resize, and choose Keep Cropped resolution. Note that this anamorphic encoding requires a higher bitrate and usually at least 1400 MB target filesize. The height will be set automatically. For progressive 23.976 fps content (Forced FILM in DVD2AVI), it is not necessary to enable any Video Filters, Color Filters, or Anime Filters. Your Video settings should now look something like:
This is the section for advanced users, but here are a couple of commonly used pre-filters.
If in the DVD2AVI section you had to choose Video->Field Processing (None), it is time to choose the inverse telecine filter. At the bottom of the Video page, there is a Filters tab. Click on this. In the Field Filter section, choose InverseTelecine (Decomb).
If your source is an older movie, and/or grainy, it is wise to choose a noise-reduction pre-filter. I would recommend FluxSmooth. Choose (Light) for normal grain and (Medium) for severe grain or older movies. Convolution3D is also popular, and works about the same as FluxSmooth.
Your filters tab could then end up looking like:

Not covered yet, and not currently complete in AutoRV10.
Then, go to the Codec tab.
The codec options for my example encoding now looks like this:

Finally, it is time to go the Output tab. Click the Add Job button, then choose Process Priority (Below Normal), and optionally Split Total File After for instance 700MB. Click OK on this dialog box:

Finally, the Output page as it is almost ready to start:

And... Press Start Encode button when you are ready to start. First, BeSweet will run for while converting the AC3 track to WAV file(s). Then, command line producer will run for even longer encoding the content in RealVideo 10, optionally encoding the credits first. Why? Because after it knows how much space the credits take, it will adjust the bitrate for the main movie, to adjust for the lower bitrate credits section. The RealVideo 10 first pass will be very fast, and the second pass slower.
Another option is to read the VOB files directly in Producer, using an installed MPEG-2 DirectShow filter (Elecard MPEG-2 player is known to work). This DirectShow option appears to be simpler, and may in some rare cases work as well as AutoRV9, but is much less flexible. With the DirectShow method it is